

MVVM (Model View ViewModel) Architecture Pattern in Android


We’ll be discussing and implementing the Android MVVM architectural pattern in our Android application.
Why do we need these patterns?
Adding everything to a single activity or fragment would lead to problems in testing and refactoring the code. Hence, the use of separation of code and clean architecture is recommended.
Model—View—ViewModel (MVVM) is the industry-recognized software architecture pattern that overcomes all the drawbacks of MVP and MVC design patterns. MVVM suggests separating the data presentation logic (views or UI) from the core business logic part of the application.
The separate code layers of MVVM are:
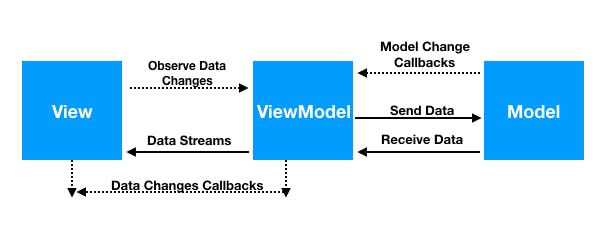
Model: This holds the data of the application. It cannot directly talk to the View. Generally, it’s recommended to expose the data to the ViewModel through Observables.
View: It represents the UI of the application devoid of any Application Logic. It observes the ViewModel.
ViewModel: It acts as a link between the Model and the View. It’s responsible for transforming the data from the Model. It provides data streams to the View. It also uses hooks or callbacks to update the View. It’ll ask for the data from the Model.
The following flow illustrates the core MVVM pattern.
The MVVM pattern has some similarities with the MVP (Model—View—Presenter) design pattern, as the presenter role is played by ViewModel. However, the drawbacks of the MVP pattern have been solved by MVVM in the following ways:
ViewModel does not hold any kind of reference to the View.
Many to-1 relationships exist between View and ViewModel.
No triggering methods to update the View.
There are two ways to implement MVVM in Android:
Data Binding
RXJava
Here, we’ll be using data binding only. Google introduced the Data Binding Library in order to bind data directly in the XML layout. We’ll be creating a simple login page example application that asks for user inputs. We’ll see how the ViewModel notifies the View when to show a toast message without keeping a reference to the View.
How is it possible to notify a class without having a reference to it? It can be done in three different ways:
Using Two Way Data Binding
Using Live Data
Using RxJava
Two Way Data Binding
Two-way Data Binding is a technique of binding your objects to your XML layouts such that the Object and the layout can both send data to each other. In our case, the ViewModel can send data to the layout and also observe changes. For this, we need a BindingAdapter and custom attribute defined in the XML. The binding adapter would listen to changes in the attribute property. This point can be visualized by the example in this tutorial.
Syntax for the two way data binding is @={variable}
Adding the Data Binding Library
Add the following code to your app’s build.gradle file:
android {
    dataBinding {
        enabled = true
    }
}
This enables data binding in your application.
Adding the Dependencies
Add the following dependencies to your build.gradle file :
implementation 'android.arch.lifecycle:extensions:1.1.1'
Data Class
The data class would hold the user’s email and password. The following User.kt class does it:
package com.dev.androidmvvmbasics.model

data class User(
    var email: String,
    var password: String
)
Two-way Data Binding allows us to bind objects in the XML layouts such that the object can send data to the layout, and vice versa. The Syntax for two way data binding is @={variable}
Layout
The code for the activity_main.xml is given below:
<?xml version="1.0" encoding="utf-8"?>
<layout xmlns:android="https://schemas.android.com/apk/res/android"
    xmlns:bind="https://schemas.android.com/tools">

    <data>

        <variable
            name="viewModel"
            type="com.dev.androidmvvmbasics.viewmodels.LoginViewModel" />
    </data>


    <androidx.core.widget.NestedScrollView
        android:layout_width="match_parent"
        android:layout_height="match_parent">

        <LinearLayout
            android:layout_width="match_parent"
            android:layout_height="wrap_content"
            android:layout_gravity="center"
            android:layout_margin="8dp"
            android:orientation="vertical">

            <EditText
                android:id="@+id/etEmail"
                android:layout_width="match_parent"
                android:layout_height="wrap_content"
                android:hint="Email"
                android:inputType="textEmailAddress"
                android:padding="8dp"
                android:text="@={viewModel.userEmail}" />

            <EditText
                android:id="@+id/etPassword"
                android:layout_width="match_parent"
                android:layout_height="wrap_content"
                android:hint="Password"
                android:inputType="textPassword"
                android:padding="8dp"
                android:text="@={viewModel.userPassword}" />


            <Button
                android:layout_width="match_parent"
                android:layout_height="wrap_content"
                android:layout_marginTop="8dp"
                android:onClick="@{()-> viewModel.onLoginClicked()}"
                android:text="LOGIN"
                bind:toastMessage="@{viewModel.toastMessage}" />
        </LinearLayout>
    </androidx.core.widget.NestedScrollView>
</layout>
Data Binding requires us to set the layout tag at the top. Here our ViewModel binds the data to the View. ()-> viewModel.onLoginClicked() invokes the Button click listener lambda defined in our ViewModel. The EditText updates the values in the Model (via View Model). bind:toastMessage="@{viewModel.toastMessage}" is a custom attribute we’ve created for two-way data binding. Based on changes in the toastMessage in the ViewModel the BindingAdapter would get triggered in the View.
ViewModel
The code for the LoginViewModel.kt is given below:
package com.dev.androidmvvmbasics.viewmodels

import android.databinding.BaseObservable
import android.databinding.Bindable
import android.text.TextUtils
import android.util.Patterns

import com.android.databinding.library.baseAdapters.BR
import com.dev.androidmvvmbasics.model.User

class LoginViewModel : BaseObservable() {
    private val user : User
    private val successMessage = "Login was successful"
    private val errorMessage = "Email or Password not valid"
    @Bindable var toastMessage : String? = null
        private set

    private fun setToastMessage(toastMessage : String) {
        this.toastMessage = toastMessage
        notifyPropertyChanged(BR.toastMessage)
    }

    @get:Bindable var userEmail : String?
        get() = user.getEmail()
        set(email) {
            user.setEmail(email)
            notifyPropertyChanged(BR.userEmail)
        }
    @get:Bindable var userPassword : String?
        get() = user.getPassword()
        set(password) {
            user.setPassword(password)
            notifyPropertyChanged(BR.userPassword)
        }

    init {
        user = User("", "")
    }

    fun onLoginClicked() {
        if (isInputDataValid) setToastMessage(successMessage) else setToastMessage(errorMessage)
    }

    val isInputDataValid : Boolean
        get() = !TextUtils.isEmpty(userEmail) && Patterns.EMAIL_ADDRESS.matcher(userEmail)
                .matches() && userPassword!!.length > 5
}
The methods called for in the layout are implemented in the above code with the same signature. If the XML counterpart of the method doesn’t exist, we need to change the attribute to app:. The above class can also extend ViewModel. But we need BaseObservable since it converts the data into streams and notifies us when the toastMessage property is changed. We need to define the getter and setter for the toastMessage custom attribute defined in the XML. Inside the setter, we notify the observer (which will be the view in our application) that the data has changed. The view (our activity) can define the appropriate action.
BR class is auto-generated from data binding when you rebuild the project
The code for the MainActivity.kt class is given below:
package com.dev.androidmvvmbasics.views

import android.databinding.BindingAdapter
import android.databinding.DataBindingUtil
import android.support.v7.app.AppCompatActivity
import android.os.Bundle
import android.view.View
import android.widget.Toast
import com.dev.androidmvvmbasics.R
import com.dev.androidmvvmbasics.databinding.ActivityMainBinding
import com.dev.androidmvvmbasics.viewmodels.LoginViewModel


class MainActivity : AppCompatActivity() {
    override fun onCreate(savedInstanceState : Bundle?) {
        super.onCreate(savedInstanceState)
        val activityMainBinding : ActivityMainBinding = DataBindingUtil.setContentView(this, R.layout.activity_main)
        activityMainBinding.setViewModel(LoginViewModel())
        activityMainBinding.executePendingBindings()
    }

    companion object {
        @BindingAdapter("toastMessage") fun runMe(view : View, message : String?) {
            if (message != null) Toast.makeText(view.getContext(), message, Toast.LENGTH_SHORT)
                    .show()
        }
    }
}
Thanks to DataBinding, the ActivityMainBinding class is auto-generated from the layout. The @BindingAdapter method gets triggered whenever the toastMessage attribute defined on the Button is changed. It must use the same attribute as defined in the XML and in the ViewModel. So in the above application, the ViewModel updates the Model by listening to the changes in the View. Also, the Model can update the view via the ViewModel using the notifyPropertyChanged.
More information will be available on the below official page:
developer.chrome.com/multidevice/android/cu..